
Scope Functions
가본적으로 5개의 함수가 하는 일은 같다(블록안에 코드를 실행). 다만 어떻게 객체가 블록안에서 사용되는지와 return 값이 어떻게 되는지에 따라 조금씩 다르다.
일반적으로 다음과 같이 쓰인다.
data class Person(var name: String, var age: Int, var city: String) {
    fun moveTo(newCity: String) { city = newCity }
    fun incrementAge() { age++ }
}

fun main() {
//sampleStart
    Person("Alice", 20, "Amsterdam").let {
        println(it)
        it.moveTo("London")
        it.incrementAge()
        println(it)
    }
//sampleEnd
}let을 쓰지 않는다면 다음과 같이 쓸때마다 같은 이름을 반복해서 쓰게 된다.
data class Person(var name: String, var age: Int, var city: String) {
    fun moveTo(newCity: String) { city = newCity }
    fun incrementAge() { age++ }
}

fun main() {
//sampleStart
    val alice = Person("Alice", 20, "Amsterdam")
    println(alice)
    alice.moveTo("London")
    alice.incrementAge()
    println(alice)
//sampleEnd
}
scope function 은 딱히 새로운 기술을 제공하는건 아니고 코드를 간략하게 하고 읽기쉽게 만들어준다.
경우에 따라 적합한 것을 골라쓰는게 조금 어려울 수도 있다. 코드작성의 의도나 일관성에 따라 선택하여 쓸 수 있다. 아래에서 scope function 를 용도에 따라 구분하여 사용하는 법에 대해서 서술하겠다.
차이점
scope function 은 언뜻보기엔 비슷하기 때문에 각각의 차이점을 이해하는게 중요하다. 구별되는 두가지 차이점은 다음과 같다.
- 객체를 접근하는 방식 -> 일반 함수와 확장 함수로 구별
- 리턴 값
객체 접근: this 혹은 it
scope function 에서의 객체 참조는 실제 이름대신 람다 리시버 this 와 람다 매개변수 it으로 접근한다. 기능은 같지만 각기 다른 경우에 어떠한 장단점이 있는지 알아보자
fun main() {
    val str = "Hello"
    // this
    str.run {
        println("The receiver string length: $length")
        //println("The receiver string length: ${this.length}") // does the same
    }

    // it
    str.let {
        println("The receiver string's length is ${it.length}")
    }
}
this
run, with, apply 에서는 람다 리시버인 this로 객체에 접근한다. 그리고 람다 안에서는 일반적인 클래스 함수에 있는 객체처럼 사용할 수 있다. this를 생략하고 사용할 수 있지만 생략할 경우 리시버의 멤버인지 외부 객체/함수 인지 구분하기 어렵다. 그래서 this를 사용하는걸 추천
data class Person(var name: String, var age: Int = 0, var city: String = "")

fun main() {
//sampleStart
    val adam = Person("Adam").apply {
        age = 20                       // same as this.age = 20 or adam.age = 20
        city = "London"
    }
    println(adam)
//sampleEnd
}
it
let 과 also 에서는 람다 매개변수인 it으로 객체 참조.
import kotlin.random.Random

fun writeToLog(message: String) {
    println("INFO: $message")
}

fun main() {
//sampleStart
    fun getRandomInt(): Int {
        return Random.nextInt(100).also {
            writeToLog("getRandomInt() generated value $it")
        }
    }

    val i = getRandomInt()
//sampleEnd
}
it 은 이름변경이 가능하다. 다음과 같이
import kotlin.random.Random

fun writeToLog(message: String) {
    println("INFO: $message")
}

fun main() {
//sampleStart
    fun getRandomInt(): Int {
        return Random.nextInt(100).also { value ->
            writeToLog("getRandomInt() generated value $value")
        }
    }

    val i = getRandomInt()
//sampleEnd
}
Return value
리턴 값으로 구별하면 다음과 같다.
apply,also은 리시버 객체 리턴let,run,with은 람다 결과 리턴
결과 값을 가지고 다음코드에서 무엇을 할지에 따라 선택해서 사용하면 됨
Context object
apply, also 는 객체 자신을 리턴하기 때문에 다음과 같이 chain 형태로 사용할 수 있다.
fun main() {
//sampleStart
    val numberList = mutableListOf<Double>()
    numberList.also { println("Populating the list") }
        .apply {
            add(2.71)
            add(3.14)
            add(1.0)
        }
        .also { println("Sorting the list") }
        .sort()
//sampleEnd
    println(numberList)
}
함수의 리턴 결과로도 다음과 같이 쓸 수 있다.
import kotlin.random.Random

fun writeToLog(message: String) {
    println("INFO: $message")
}

fun main() {
//sampleStart
    fun getRandomInt(): Int {
        return Random.nextInt(100).also {
            writeToLog("getRandomInt() generated value $it")
        }
    }

    val i = getRandomInt()
//sampleEnd
}
람다 결과
let, run, with 은 람다 결과 값을 리턴한다. 그래서 결과값을 변수에 넣거나 결과에 체이닝 연산을 걸 수 있다.
fun main() {
//sampleStart
    val numbers = mutableListOf("one", "two", "three")
    val countEndsWithE = numbers.run {
        add("four")
        add("five")
        count { it.endsWith("e") }
    }
    println("There are $countEndsWithE elements that end with e.")
//sampleEnd
}
또한, 리턴값을 무시하고 변수를 위한 임시 scope 를 만들 수도 있다.
fun main() {
//sampleStart
    val numbers = mutableListOf("one", "two", "three")
    with(numbers) {
        val firstItem = first()
        val lastItem = last()
        println("First item: $firstItem, last item: $lastItem")
    }
//sampleEnd
}
Functions
각각의 상황에 맞는 scope function 선택을 위해 좀더 상세한 설명
let
객채는 매개변수으로 사용(it).
리턴값은 람다 결과.
let은 콜체인의 결과에서 하나 이상의 함수 호출하는데 사용할 수 있다.
fun main() {
//sampleStart
    val numbers = mutableListOf("one", "two", "three", "four", "five")
    val resultList = numbers.map { it.length }.filter { it > 3 }
    println(resultList)
//sampleEnd
}
let 을 사용하면 다음과 같이 고칠 수 있다.
fun main() {
//sampleStart
    val numbers = mutableListOf("one", "two", "three", "four", "five")
    numbers.map { it.length }.filter { it > 3 }.let {
        println(it)
        // and more function calls if needed
    }
//sampleEnd
}
만약 블록이 it 을 매개변수로 갖는 함수를 포함한다면 람다대신에 :: 매서드 레퍼런스를 사용할 수 있다.
fun main() {
//sampleStart
    val numbers = mutableListOf("one", "two", "three", "four", "five")
    numbers.map { it.length }.filter { it > 3 }.let(::println)
//sampleEnd
}
let 은 ?. 를 붙여 non-null value 검사도 할 수 있다.
fun processNonNullString(str: String) {}

fun main() {
//sampleStart
    val str: String? = "Hello"
    //processNonNullString(str)       // compilation error: str can be null
    val length = str?.let {
        println("let() called on $it")
        processNonNullString(it)      // OK: 'it' is not null inside '?.let { }'
        it.length
    }
//sampleEnd
}let의 다른 사용법에는 코드 가독성을 위해 scope를 제한하는 법도 있다. 객체를 위한 새로운 변수를 정의하기 위해 it 대신 람다 매개변수로 이름을 지정할 수 있다.
fun main() {
//sampleStart
    val numbers = listOf("one", "two", "three", "four")
    val modifiedFirstItem = numbers.first().let { firstItem ->
        println("The first item of the list is '$firstItem'")
        if (firstItem.length >= 5) firstItem else "!" + firstItem + "!"
    }.toUpperCase()
    println("First item after modifications: '$modifiedFirstItem'")
//sampleEnd
}
with
확장함수가 아닌 일반함수: 객체는 매개변수로 전달, 객체를 람다 안에서 리시버로 받는다(this). 리턴값은 람다결과
with은 람다 결과없는 객체를 위해 사용하는 것을 추천 with는 "이 객체로 다음과 같이 실행" 으로 읽혀질 수 있다.
fun main() {
//sampleStart
    val numbers = mutableListOf("one", "two", "three")
    with(numbers) {
        println("'with' is called with argument $this")
        println("It contains $size elements")
    }
//sampleEnd
}with의 다른 사용법은 객체의 멤버나 함수를 사용해서 값을 계산할 때
fun main() {
//sampleStart
    val numbers = mutableListOf("one", "two", "three")
    val firstAndLast = with(numbers) {
        "The first element is ${first()}," +
        " the last element is ${last()}"
    }
    println(firstAndLast)
//sampleEnd
}
run
객체는 리시버로 사용된다 (this). 리턴값은 람다 결과 값
run은 with와 비슷하지만 let처럼 객체의 확장함수로 동작한다.
run은 객체 초기화와 리턴값 계산을 하는 람다에서 유용하게 쓸 수 있다.
class MultiportService(var url: String, var port: Int) {
    fun prepareRequest(): String = "Default request"
    fun query(request: String): String = "Result for query '$request'"
}

fun main() {
//sampleStart
    val service = MultiportService("https://example.kotlinlang.org", 80)

    val result = service.run {
        port = 8080
        query(prepareRequest() + " to port $port")
    }

    // the same code written with let() function:
    val letResult = service.let {
        it.port = 8080
        it.query(it.prepareRequest() + " to port ${it.port}")
    }
//sampleEnd
    println(result)
    println(letResult)
}run호출은 일반함수로 사용할 수도 있다. 일반함수 run은 인자가 없는 익명 함수처럼 동작한다.
fun main() {
//sampleStart
    val hexNumberRegex = run {
        val digits = "0-9"
        val hexDigits = "A-Fa-f"
        val sign = "+-"

        Regex("[$sign]?[$digits$hexDigits]+")
    }

    for (match in hexNumberRegex.findAll("+1234 -FFFF not-a-number")) {
        println(match.value)
    }
//sampleEnd
}
apply
객체는 리시버로 사용된다 (this). 리턴값 은 객체 자기자신이다.
코드 블록에서 apply는 리턴값을 가지지 않고 리시버 객체의 멤버 연산에 사용된다. 객체구성이 일반적인 경우이다. 이런한 호출은 "이러한 할당을 오브젝트에 적용한다"라는 식으로 읽을 수 있다.
data class Person(var name: String, var age: Int = 0, var city: String = "")

fun main() {
//sampleStart
    val adam = Person("Adam").apply {
        age = 32
        city = "London"
    }
    println(adam)
//sampleEnd
}
리시버가 리턴값으로 사용되면 apply를 좀더 복잡한 연산에 콜체인으로 사용할 수 있다.
also
객체는 매개변수(it)로 전달된다. 리턴값은 객체 자신
also는 객체를 매개변수로 처리하는데 유용하다. 로깅같이 디버깅 정보를 출력하는 처리 등 객체의 멤버보단 객체 참조가 필요한 동작에 사용된다.
also를 코드에서 읽을 때 "그리고 객체로 이 동작도 수행하라"라는 뜻으로 해석할 수 있다.
fun main() {
//sampleStart
    val numbers = mutableListOf("one", "two", "three")
    numbers
        .also { println("The list elements before adding new one: $it") }
        .add("four")
//sampleEnd
}
함수 선택
사용목적에 따른 올바른 scope function의 선택을 돕기위해 비교정리를 하면 다음과 같다.
| Function | Object reference | Return value | Is extension function |
|---|---|---|---|
let |
it |
Lambda result | Yes |
run |
this |
Lambda result | Yes |
run |
- | Lambda result | No: called without the context object |
with |
this |
Lambda result | No: takes the context object as an argument. |
apply |
this |
Context object | Yes |
also |
it |
Context object | Yes |
의도한 목적에 따른 scope function 선택에 관한 가이드는 다음과 같다.
- non-null 객체에 대한 람다 실행 :
let - 로컬 scope 에서의 변수 표현 :
let - 객체 구성 :
apply - 객체 구성과 결과값 계산 :
run - 블럭내에서 실행할 범위 지정 : 일반함수
run - 추가적인 동작 ( 로깅같이 디버깅에 사용되는 동작) :
also - 객체단위로 동작하는 기능 :
with
scope function 은 코드를 줄이는 방법 중에 하나이긴 하지만 남용은 피하자 ( 코드 가독성을 떨어뜨리거나 에러가 나는 경우도...). scope function 을 chaining 해서 쓰게 되면 this 나 it의 값이 헷갈리거나 현재 객체를 혼동할 수 있다.
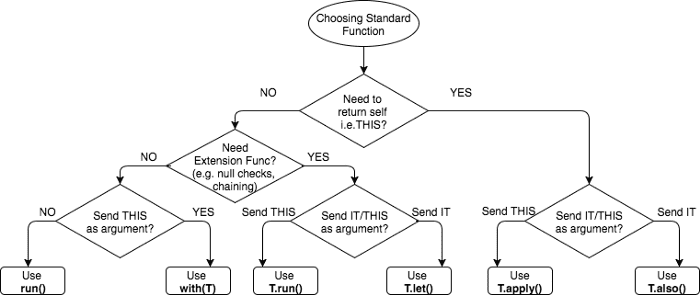
Scope Function 선택하는법
takeIf and takeUnless
standard library 에는 takeIf 와 takeUnless 함수가 포합되어 있다. 이 함수들로 콜 체인에서 객체상태를 체크할 수 있다.
takeIf 는 조건에 맞는 것을 리턴, 없을 경우 null리턴
takeUnless는 조건에 맞지 않는 것을 리턴, 없을 경우 null리턴
객체는 람다 매개변수 it로 접근 가능
import kotlin.random.*

fun main() {
//sampleStart
    val number = Random.nextInt(100)

    val evenOrNull = number.takeIf { it % 2 == 0 }
    val oddOrNull = number.takeUnless { it % 2 == 0 }
    println("even: $evenOrNull, odd: $oddOrNull")
//sampleEnd
}
확장함수이므로 ?.으로 체이닝해서 null 체크가 가능하다.
fun main() {
//sampleStart
    val str = "Hello"
    val caps = str.takeIf { it.isNotEmpty() }?.toUpperCase()
   //val caps = str.takeIf { it.isNotEmpty() }.toUpperCase() //compilation error
    println(caps)
//sampleEnd
}
takeIf 와 takeUnless 는 scope function과 같이쓰면 유용하다. 좋은 예는 let으로 체이닝해서 코드를 실행할 때 takeIf에 ?.을 달아서 let을 실행하면 null safe 한 실행을 보장할 수 있다.
fun main() {
//sampleStart
    fun displaySubstringPosition(input: String, sub: String) {
        input.indexOf(sub).takeIf { it >= 0 }?.let {
            println("The substring $sub is found in $input.")
            println("Its start position is $it.")
        }
    }

    displaySubstringPosition("010000011", "11")
    displaySubstringPosition("010000011", "12")
//sampleEnd
}
아래 코드는 standard library function을 쓰지 않을 때의 코드이다.
fun main() {
//sampleStart
    fun displaySubstringPosition(input: String, sub: String) {
        val index = input.indexOf(sub)
        if (index >= 0) {
            println("The substring $sub is found in $input.")
            println("Its start position is $index.")
        }
    }

    displaySubstringPosition("010000011", "11")
    displaySubstringPosition("010000011", "12")
//sampleEnd
}
Reference
https://kotlinlang.org/docs/reference/scope-functions.html
https://github.com/JetBrains/kotlin-web-site/blob/master/pages/docs/reference/scope-functions.md